
Match Grade M1 Garand in 30-06.
Cases, What Made Repeating Arms Possible!
When you fire a cartridge, a great many functions are performed by the cartridge case. But let’s begin with chambering the round. The completed cartridge transports, the primer, the powder charge and the projectile into the chamber of the firearm. Prior to the invention of the metal cartridge, most of this stuff was rammed down the barrel. This was a lengthy process and while muzzle loaders are still a whale of a bunch of fun, most shooters are reloading their firearms using metallic cartridges. So…
In order to chamber correctly and fire safely, a metallic cartridge must conform to what are called SAAMI standards (Sporting Arms and Ammunition Manufacturers Institute) What this boils down to are published dimensions, pressures, velocities, and the tolerances for these parameters, for virtually all modern cartridge designs. So, the firearms manufacturers, the ammunition manufacturers, and the handloader, need to be on the same page at all times to produce safe, accurate arms and ammunition.

The SAAMI published dimensions for a 30-06 cartridge. To function properly and chamber safely the cartridge must adhere to these dimensions.
So, to chamber, your cartridge needs to:
- Be the correct diameter
- Have the correct neck length
- The overall length of the casing needs to be correct (in some cases this is headspace -for example rimless straight wall cases like 45 ACP)
- If shouldered, (like a 30-06) the shoulder needs to be the correct slope and the correct distance from the base (headspace for most rimless and unbelted rifle cases)
- The overall cartridge length needs to be correct (COL)
- The projectile (bullet) needs to be properly seated to safely engage the rifling lands
- It needs to be the correct cartridge for the firearm’s chambering
When you fire the round, the firing pin strikes the primer, which detonates, shooting hot flame into the case through the flash hole, this ignites the main powder charge. The burning powder charge generates a huge volume of hot gasses which expand (read as stretch) the case to seal the chamber against escaping gas, and drive the projectile (bullet) into the lands and grooves of the barrel, which impart a spin to the projectile as it travels down the bore and out the muzzle. It then continues downrange until something stops it. Hopefully the intended safe target or backstop. After the pressure in the chamber returns to normal, the case shrinks in diameter slightly and with a little luck it can be withdrawn from the chamber and a fresh cartridge can be inserted.
As with almost everything in life, there are acceptable levels of divergence from “perfect.” This is as true in the “Fusiliery Arts” as anywhere else, but the margin is much smaller than most. Commercial manufactures of ammunition typically aim for the minimum physical dimensions allowable in completed ammunition to facilitate easy chambering. Reloaders who are aiming for the utmost in accuracy will typically aim for the closest tolerances. Why?

Happiness is a full loading block of shiny perfect cartridges. True happiness is coming home with them empty after a nice match!
Quite simply, the tighter (within limits) the cartridge fits in the chamber, and the more closely the case shoulder comes to shoulder of the chamber (headspace), and the bullet comes to contacting the lands of the bore, the better (read as smaller) the downrange groups will be. Some accuracy freaks, using bolt action firearms, will “Neck Size” only. Their thinking goes that in the process of first firing the cartridge, you have “Fire Formed” the brass case to perfectly fit the particular chamber of that particular firearm. The theory continues that by simply expanding/resizing the neck of the cartridge as you de-prime, and then ever so slightly crimp the neck as you seat the bullet (to just about touch the lands), you eliminate a whole lot of give and take that can open up groups.
Well then, isn’t this the “best way” to do things? Well, not necessarily. This approach claims give excellent groups, and extended case life, but it can also lead to difficult chambering and even tougher extraction. So, for pump, lever action, semi-autos, and/or rapid fire with a bolt gun this may not really be the best approach. For the rest of us, who also want great groups, but insist on easy action operation, the key is to create another kind of “perfect” situation. This is best accomplished through “consistency” in which each and every loaded cartridge is as close as possible to exactly identical to every other and aiming that homogeneity at a close compromise between a tight fit and ease of operation. If we do our job with powder weights, and we use good consistent projectiles and primers in matched case lots, there is only one variable left. OK that’s a lie, but let’s go with it for a while and pretend that the rifle and marksman have no input! So, the one variable left is…
Case Preparation
We’ve already covered case sorting, cleaning, and resizing, and now we have all these nicely resized and decapped cases all shiny and new looking. We’ve ironed out all the dents and dings through the resize process, we’ve checked all the cases for signs of case failure, such as neck splits, and/or bright rings around the web, and we’ve made certain that all the cases in this batch are from the same manufacturer, lot, and number of firings. Since our imaginary lot is all once fired cases, we can now move forward with case preparation.
Being the curious sort, we’ve also checked the SAMMI specs (This is the part where you discover that you also need a reloading manual and a micrometer) and determined the “trim to length” for our particular cartridge casing. The drawing above indicates a case length of 2.494 in. This is the maximum length, but if you look close you will also see a “-.020 in.” indicated which is the maximum deviation negatively or shorter. So you could have cases ranging from 2.474 in. through 2.494 in.
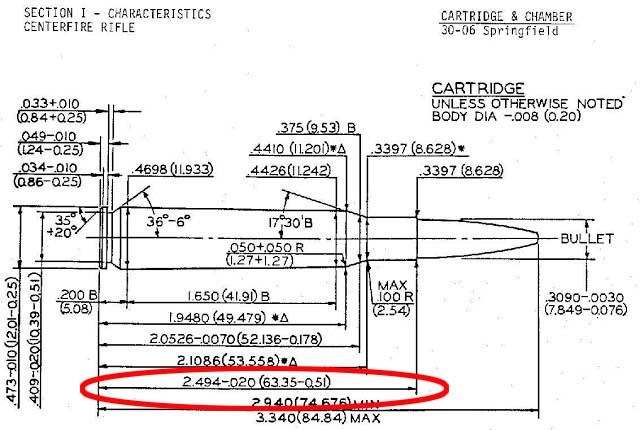
SAAMI drawing with Case length spec highlighted.
When we peer into the primer pocket we are abhorred to see grunge from the last firing, and some tumbler media stuck in the primer flash hole.
A dirty primer pocket with tumbling media stuck in the flash hole. This particular case was tumbled a very long while ago, so out has tarnished again but hopefully you get the point.
So for a moment we choose to forget about that grunge and the media and measure up a bunch of the random cases in our lot, and we discover to a our absolute horror, that “Gary lied”! These nice commercial cases are NOT the same length, they are not even as long as SAAMI says they should be! Well not exactly, the TTL is the maximum allowable length, so these shorties are actually ok, well kind of…
Since we want these cases to be consistent we will want to trim them to uniform length. Depending upon who you talk to, the trim to length and the maximum case length vary by between .005″ and .020″ for cases that head space on the shoulder or rim. Cases that headspace on the case neck (such as 45 ACP) the case length is absolute. OK , if you’re still reading along and haven’t left shaking your head and giving up the entire idea, here’s the bottom line.
You want your cases to be as close as possible the same length, because you want the bullet when it seats into the case neck to be held by the same amount of friction with the case neck, crimped or not. But if you are applying a crimp of any sort, taper or roll, the amount of crimp is determined by how far up into the die the case neck moves as you seat the bullet. You want the case necks to extend into the crimping area of the die as uniformly as possible so that the friction, or release forces of the case neck are as uniform as possible. So the first stage of case preparation is uniforming the case length. Enter the case trimmer.
The Case trimmer is the first step to uniforming cases, trimming them to equal length.
Case Trimming
The first time you trim your cases, you are really simply making them uniform, but after a few firing cycles, the process of expanding (firing) and resizing the cases they will actually get longer than the maximum SAAMI specification. The brass flows as it is stretched and squeezed and the only way for it to flow is out of the dies and/or chamber toward the case neck. If left untrimmed after a sufficient number of firings, the case neck will become too long and jam itself and the bullet into the chamber freebore or throat likely causing elevated chamber pressure. This is NOT GOOD. So, periodically you need to measure your overall case length and trim them down for accuracy and safety. Typically a single trimming session can be good for three or four firings, and honestly depending upon your loadings and the chamber in which the rounds are fired, by the time you’ve trimmed them 3 times, you’re probably looking at the end of case life.
So, how do you trim the buggers, well there are various methods, but if you are into reloading enough to bother reading this, go out and get a rotary case trimmer. While you’re at it, also pick up a case preparation station like the ones by RCBS and Lyman, more on that later.
Carefully measure your case length and determine what case length you will be using. After trimming and debarring check them again to make certain they all match.
Take one case and decide on what your case length is going to be for the caliber you are reloading. As I mentioned earlier, check the drawing in your reloading manual, and after researching, decide on your TTL. Take your first case and slowly trim it to the length you have determined. Once this is achieved, take a magic marker and write the TTL onto the case. Insert the case back into the case trimmer and make certain that it is adjusted to that length. Keep that first case on the shelf or in a drawer near your reloading area to serve as your gauge for setting up your trimmer in the future.
Once you have your “Standard Trim to Length” cut mark the case and put it on the shelf to save on set up time for the trimmer.
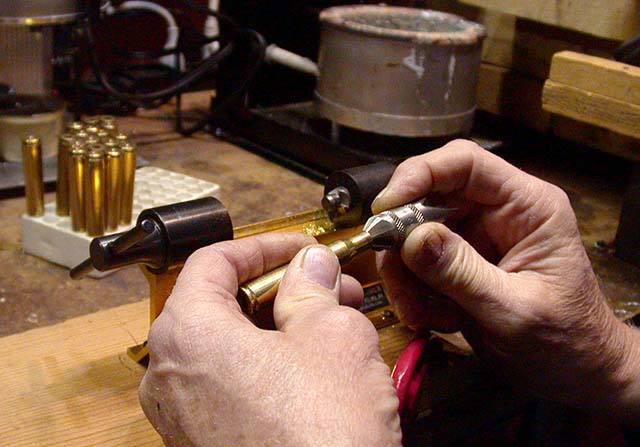
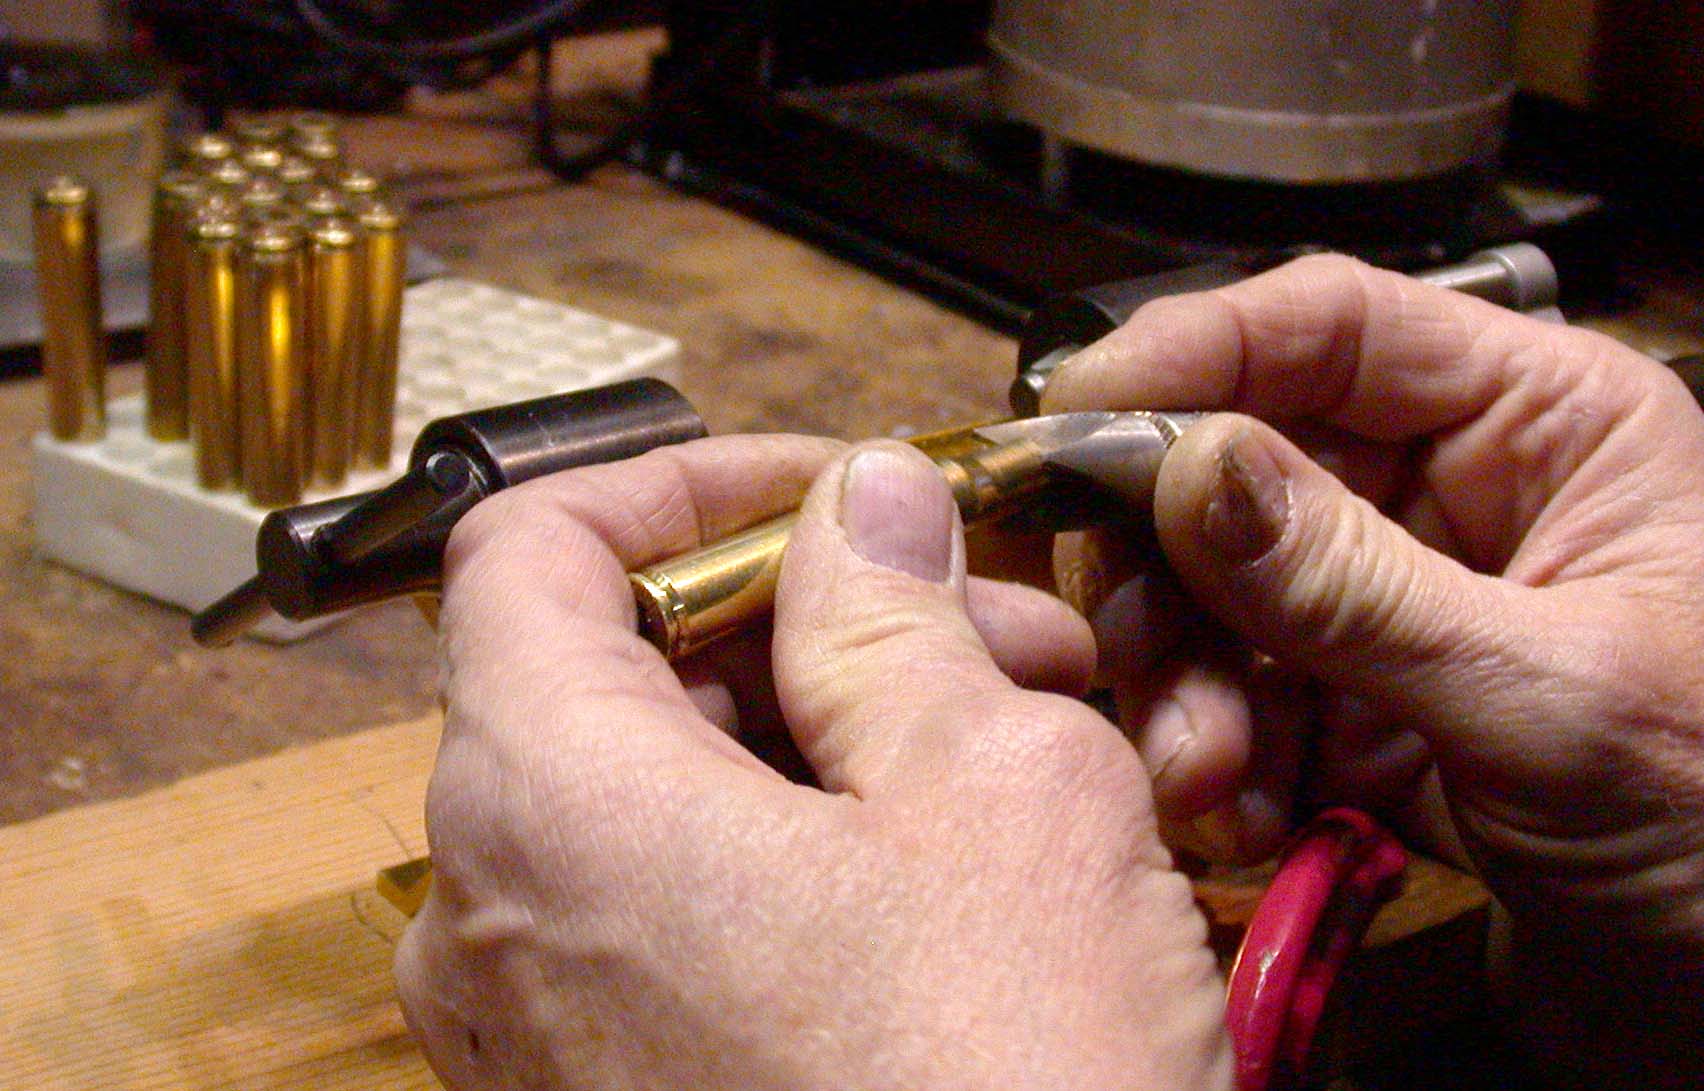
So how exactly do you use the trimmer? Most rotary trimmer use collets to hold the case and mandrils to center the neck. Select the appropriate collet, insert the case head firmly into the base of the collet, insert the mandrel into the case neck, then twist the handle on the collet until it is firm, securing the case in the trimmer squarely. Rotate the trimmer handle pressing inward until the cutting of the case neck is completed. Remove the case and check the TTL with your caliper. It’s not unusual for things to have to “settle” while you’re adjusting the trimmer. The first one or two cases will likely require some adjustment for consistent results, save the cases anyway and use them for “sighters” they’ll be fine as long as they are within tolerances. Get used to applying the same amount of torque to the collet handle as this determines to some extent how deeply the case is set back into the trimmer. The key to all aspects of reloading is consistency.
Insert your standard length case into the collet and insert the mandrel into the case mouth, torque up the collet handle, then adjust the trimmer to the case length.
You now have a nice pile of fifty to a hundred or more nicely trimmed cases. Take a close look at them all shiny and uniform in length. Now run your finger across the moth of the case. Feel that edge or lip of brass around the mouth of the case (sprue), It’s gotta go! Welcome to chamfering!
The process of case trimming leaves a “lip” or sprue around the inside and outside of the case mouth. This must be removed using a debarring tool.
Chamfering Your Case Mouthes
There is a hand held tool for this operation and I have used mine for decades. You simply turn the pointy end inside the case neck, I use four rotations, and then you turn it around and run the legs around the outside of the case mouth the same number of times. This removes the burrs around the case mouth and gives a nice bevel to the mouth of the case to make seating the bullet easier.
Debur the inside of the case mouth with the pointy end using uniform pressure and a uniform rotation and feel.
Debur the outside of of your case mouth using the same technique and the “legs” end of the tool.
Cleaning Your Primer Pockets
When we were ranting on about military brass and needing to ream or swage the primer pockets, I mentioned primer pocket cleaning. The primers have a kind of salty gritty residue that will remain in most cases using standard media in vibratory case cleaning systems, even if you clean them after resizing and decapping. The rumored exception to this is pin tumbling which uses a rotary tumbler and steel pins in a solution. I haven’t tried it yet so I can’t comment. On one level, it’s kind of like, why make the bed, it’s only gonna get messed again tonight. On the other level, making cases uniform means everything. Seating a primer in a nice clean, uniform primer pocket will result in a more consistent ignition, than a primer which is sitting on deposits from an old primer. So perhaps it is best to have a clean primer pocket.
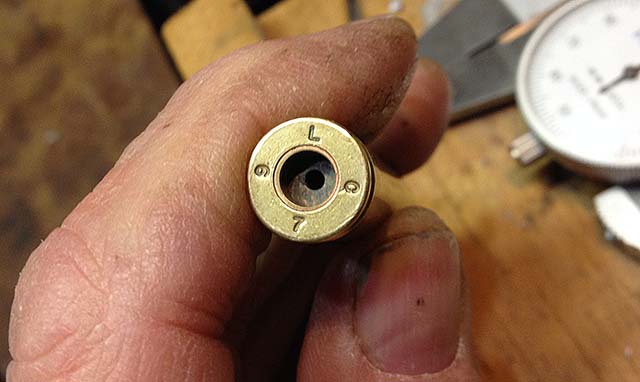
Here’s a dirty primer pocket.
I never found the little hand held brushes to work worth the bother, so with me, primer pocket cleaning was a sometime thing. Since I got my Case prep station, I clean the pockets pretty regularly. Does it make a difference? Eh? But maybe? It’s kind of like going to church, better safe than sorry, right? What does make a difference is primer pocket uniforming…
Primer Pocket Uniforming
This operation is of particular value after swaging, or reaming military brass, but it also seems to be of benefit with commercial cases as well. IMHO it is required only once after the initial firing. This tool merely makes primer pockets uniform in depth and square to the axis of the case. I find that primers seat much more consistently in uniformed pockets than not.
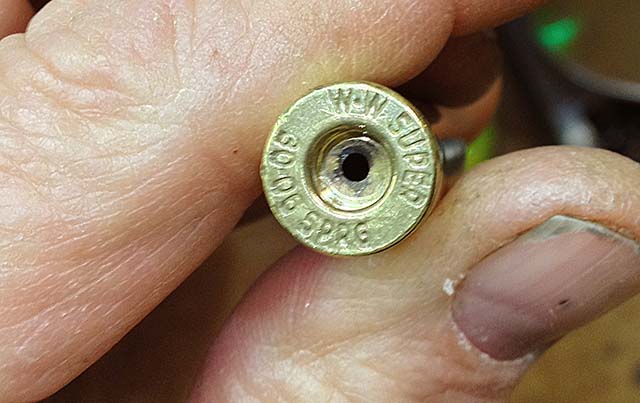
Here is an example of a primer pocket that has been both cleaned and uniformed. If you look really close you can see where the inside shoulder has been routed out to be more square. A primer will certainly seat more squarely.
The process also cleans them further. Additionally, the case prep centers also provide a great reaming tool for both large and small military primed brass, which leads me to…

The Case Prep Center comes with Large and Small primer pocket accessories, the motor provides the effort and quite simply you move the case around the stations to complete your case preparation.
The Easy Way And The Hard
A long time ago I mentioned the easy way and the hard. The hard way is to perform all these operations by hand with little hand held tools. I did this for decades. It works just fine for smaller runs of maybe fifty reloads. But if you are a competitive shooter and you’re using a few hundred rounds a month, you are much better with a Case Prep Center. You will perform the operations more regularly and with far less effort and time. It’s well worth it!
Next up: Priming Cases – The First Step?? to Great Ammo!
